
After you learn how to use the micrometer, the next basic is how to read the micrometer or taking the reading. The unit system that’s used in micrometers has two versions. Therefore in this page, we cover how to read a micrometer in those two versions: metric (mm) and imperial (inch).
Reading a micrometer is not too difficult, but not as simple as we may think of, such as reading a tape measure. However, it takes some steps which need the users to get a bit educated first especially for the beginners. There require some multiplication and addition.
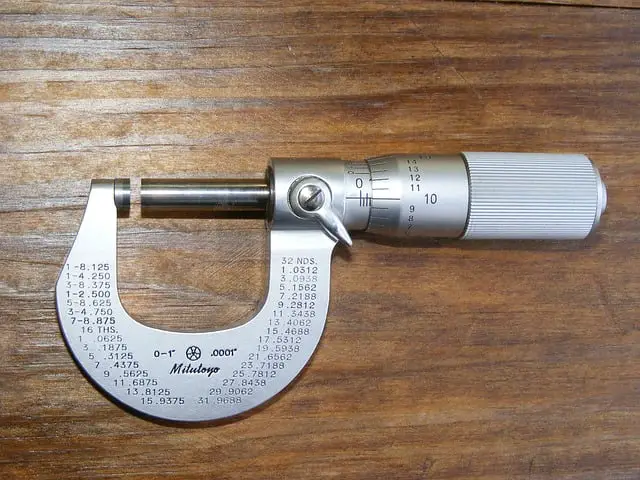
The multiplication and addition are gained from the separated scales. In general, the micrometer has two main scales: the main scale (on the sleeve barrel) and the second scale (on the thimble). Today’s most micrometers, however, an additional vernier scale (on the upper side of the main scale) is added to improve the accuracy.
Another important thing when reading a micrometer is proper care. It can cause inaccuracy when you take the reading at the wrong angle. That is to say, make sure your vision goes straight to the center of the scale barrel during the reading. Furthermore, you need to zero the micrometer first to check whether there’s zero error or not to gain a more trustable result.
Your Micrometer Unit System Matters
As said before, the manufacturers etch the micrometers with either the imperial or metric unit system. It depends on the country where the micrometers will be sold. In fact, in the United States, for instance, most micrometers are sold with the imperial system (inch). That is because the imperial system is more popular and widely used in there. While in Asia, the measurement generally uses the metric system.
When you compare, you’ll notice that the number of divisions on the sleeve scale among them is different. The metric has 50 divisions, while the imperial has 40 divisions. It can be complicated because each division represents a different reading. Similarly, the represented value of the thimble scale is also different among them.
While you are relying on manual reading, the micrometer unit system matters. Therefore, you have to learn how to read the micrometer in mm and inch. Whether you are in the United State or in countries of Asia, you have been educated to use the stuff. Except, you use digital ones which you can convert the unit into another easily in no time.
Reading A Mechanical Micrometer
How to Read A Metric Micrometer
Before going further, it’s important to clarify that in this case, we assume that you are using a 1-inch range micrometer. This is important because different range affects the number of divisions etched on the sleeve scale.
- Sleeve Scale. It acts as the main scale. The smallest division represents 0.5mm and marked with a shorter line and no numbers positioned on the lower side. The biggest division represents 1mm and marked with a long line and numbers positioned on the upper side.
- Thimble Scale. It acts as the second scale and has 50 equivalent divisions. For one complete revolution, the thimble moves axially 0.5mm (one smallest division of the sleeve scale). Equally, for one-fiftieth revolution (one division movement), the spindle moves axially 0.01mm. It is obtained from 0.5mm divided by 50 divisions as previously explained in the article “How A Micrometer Works“.
- Vernier Scale. A vernier scale has 10 divisions. Each division on the vernier scale is 9/10 of the length of the smallest division of the thimble scale.
1. Reading the Sleeve Scale
Count the exposed divisions that appear on the upper side. More simply, read the closest number to the edge of the thimble that’s exposed. Then, it has to be multiplied by 1mm. Also, check the short line the read number on the lower side after. If it comes into sight, then add 0.5mm into the calculation.
2. Reading the Thimble Scale
Look at carefully the index line. The position of your eyes has to go straight to the center of the barrel. Read the line on the thimble that coincides with the index line. The number of divisions from 0 to the aligned line then has to be multiplied with 0.01mm.
3. Reading the Vernier Scale
After obtaining the thimble reading, back again to the sleeve barrel to read the vernier scale. Look at the line on the vernier scale that lines up with one of the lines on the vernier scale. Then multiply with the least count of the vernier scale which is in thousands of a millimeter (0.001mm)
4. Final Calculation
The final calculation is obtained by adding all the readings of the primary scale, the secondary scale, and the vernier scale. In the given above, then the total calculation is
Total Reading = Sleeve + Thimble + Vernier Scale
How to Read An Imperial Micrometer
Similarly, we assume the imperial micrometer you are using has 1″ range.
- Sleeve Scale. The sleeve scale is divided into 40 equivalent parts that the smallest division is 0.025″ in length. Every four divisions (0.01″) started from 0, there will be marked with a long line and number. The rest of it is marked with short lines and no number.
- Thimble Scale. On the thimble scale, the circumference is divided into 25 equivalent divisions in which each division represents 0.001″ (0.025″ divided by 25 divisions equals to 0.001″).
- Vernier Scale. Nothing changes compared to the vernier scale of imperial scale.
1. Reading the Sleeve Scale (Primary Scale)
Count how many divisions that display on the sleeve scale. Read the nearest number to the thimble that’s exposed. Then, multiply it with 0.01″. Count the short lines after that number. Multiply it with 0.025″.
2. Reading the Thimble Scale (Secondary Scale)
Look at the index line that lines up with one of the lines on the thimble scale. Count how many divisions that line from line 0. The numbered mark will help count it easily. Multiply that reading with 0.001″.
3. Reading the Vernier Scale
Look at the lines of vernier and thimble that line up each other. Count how many divisions it is from mark 0 of the vernier scale. The number will help. Multiply the reading with the least count of the vernier scale.
4. Final Calculation
Obtain the total by adding the reading of the primary scale, the secondary scale, and the vernier scale.
Total Reading = Sleeve + Thimble + Vernier Scale
Reading A Dial Micrometer
Dial micrometer is an important tool that can be used to measure brake rotor warpage, precision engine building, deck clearances and to measure the distance between two surfaces. A dial micrometer utilizes dial gauge to display the measurement reading. Therefore, the way of dial micrometer works is notably different from the mechanical micrometer. Similarly, the way to read it is different as well.
Reading a dial micrometer is easy. There are some important parts of the dial meter that you have to know first.
- Plungers: It transforms the up and down movement to the inside of dial indicator. It is also named as spindle.
- Turn counter: It usually counts the number of times the needle does one complete revolution.
- Pointers: It points to the measured number
- Bezel: It is used to rotate zero in order to align it with the needle.
- Markers: It provides reference points which is merely used by mechanics
- Points: It contacts the surface that reads measuring. It can be placed with different types.
Before the Reading
- Use the stand to stabilize the dial indicator, while taking measurements, otherwise, it will not be easy.
- Adjust the outer dial face in such a way that hand points at zero. By readjusting it, errors can be removed.
- In order to calculate the error, stop the spindle at every 1/10measurement. And repeat the process for the first two revolutions.
- For calculating the error for the next five revolutions, stop the spindle at every half revolution. If the dial makes further revolution check error for each revolution.
- Repeat this error checking process but in reverse.
- Take more measurements, by displacing the spindle over the same surface by five times. Each measurement should be the same to ensure the proper working of the dial.
- If the dial indicator shows errors, remove the dust from the spindle or adjust the outer face.
Reading the Dial Micrometer Step by Step
- Displace the spindle and align it with the item to be measured. Count the number of revolutions by pushing dial indicator against the item and hold the gauge to take measurements.
- Take all the measurements about the number of revolutions on the small gauge.
- In case dial indicator did not even make one revolution, moves toward large gauge because small gauge works only if the indicator makes one full revolution.
- If the small gauge doesn’t give the proper measurements, then multiply the length of one revolution by the number of marks shown on it.
- There should be 100 notches on the outer big face. Dial indicators are mostly marked at 5’s or 10’s for the ease. Take the readings by determining which marker the hand best lines up with.
- Count it when the gauge makes complete revolutions. We get smaller measurements from the large gauge. Small gauge measures in tents, and the outer one, in thousands.
- Add both the measurements of small gauge and outer one to find the reading of dial indicator.
Reading a micrometer manually is actually very enjoyable, especially once you have been familiar with. However, it may slow you down. You can turn to the digital model instead, but you still have to learn how to read it because your digital micrometer may run out of power. Reading manually is the emergency way. If you do not know how to do it, it takes time to wait for your new battery arrived.
