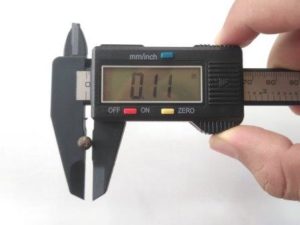
Reading a digital caliper is easier compared to reading a vernier caliper or dial caliper. It automatically displays the reading on the LCD screen. So, there is no need to calculate the main and the secondary scale. It requires less time and effort to read the measurements. Although it’s easier, when it comes to how to read a digital caliper, there is some guide you have to make sure to know.

A digital caliper is the advanced version of the caliper models. Not only it displays a quick reading, but also provides advanced features such as unit reading conversion, holding the reading, easy zero position adjustment, and even measurement data transfer.
You can quickly convert mm to inch and vice versa. The zero button lets you adjust the zero position at any point you want. Some models have a button to hold the reading although the caliper slides. Whether wireless or corded, you can easily transfer the reading to an external device such as a tablet, smartphone, laptop, and PC.
Digital Caliper’s Zero Error
The first step you need to take care of when reading a digital caliper is that the scale has to display zero reading (showing number 0) when both the jaws are closed.
If you close the jaws but the screen shows a particular reading/number (except 0), then it indicates there is a zero error. Solving it is easy. Today’s digital calipers commonly come with a “ZERO” or “ORIGIN” button. Even, they can come with these two buttons installed on the panel surrounding the LCD screen. When both the jaws are truly closed, push that zero or origin button and it will turn to number 0.
Actually, both the zero and origin functional buttons have a different function but they are a little bit similar. You could find this button on Mitutoyo 500-196-30.
Sometimes, this zero error issue is caused by tiny dirt or etc. Therefore, make sure that the jaws of the digital calipers are clean before closing the jaws. To make sure it’s clean, you could close the jaws, direct the jaws to the source of light, and there is no light that gets through the gap.
Reading the Digital Caliper is Straightforward
So, reading the digital caliper is very straightforward. The following video shows you how easy it is to measure a nail with a digital caliper.
To know the measurement result, just read on the LCD screen. From the video above, we can see that the outside diameter of the nail is 3.1 mm.
At this point, you could convert the 3.1 mm reading to an inch unit by pressing the mm/inch button. Some digital calipers allow you to convert into fractions. This model is appropriate for woodworking. Another button that you can use is “HOLD” button. Some digital calipers have this button. It functions to hold the reading so that it doesn’t change when you slide the jaw.
Adjust the Zero Point As You Want
Aside from that, at this point (where it displays 3.1 mm), you set it as the zero point. Simply press the “ZERO” button. Then, the LCD screen will turn to show a “0” reading instead of 3.1 mm.
Immediately, in this mode, the caliper becomes such a comparator or go/no-go gauge for you. It’s suitable for comparative measurements. If the other nails’ diameter is smaller than 3.1 mm, it will display negative reading (perhaps, −1 mm). Conversely, if the other nails’ diameter is greater than 3.1 mm, it will display positive reading (perhaps, +1 mm).
Using Digital Caliper and Automatically Transfer the Reading in CAD/CAM NX & Excel
Conclusion
Reading digital caliper is easy to do. The buttons that can be found on it are: ON/OFF (power button), HOLD (to hold the reading), ZERO (adjust the zero reading for comparative measurement), INCH/MM (conversion reading), and ORIGIN (to set the zero reading when the jaws are fully closed). You can directly read the readout on the LCD. Even, you could read it whether in inch and mm. Through the buttons, you quickly instruct the caliper to convert, set zero point, hold, and transfer the reading.
