
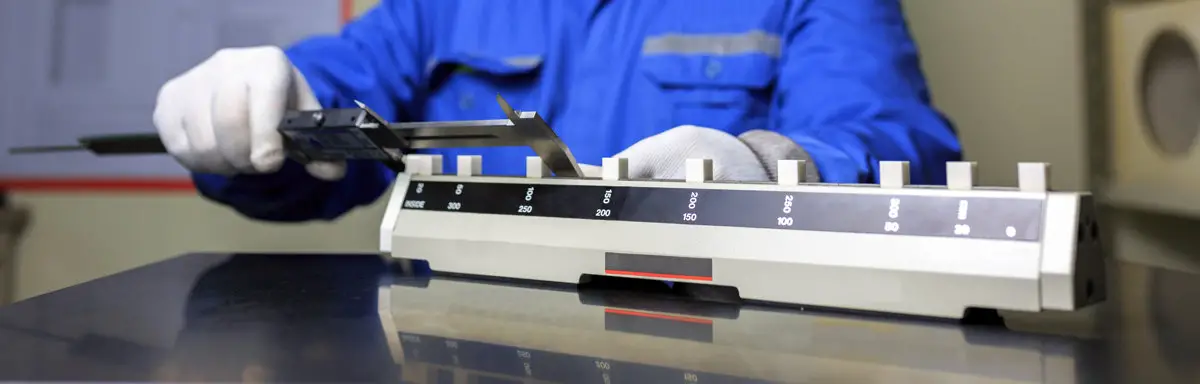
Caliper is one of the most common inspection tools, hand tools, and measurement equipment in workshops. This tool should provide accurate reading and help provide accurate measurement for the dimensional measurements of any parts, components, and products being manufactured, fabricated, and hand-made. During the frequent use of this measuring instrument, it might easily wear. If unuse, other factors such as temperature can affect the measurement accuracy of its reading. To check and maintain the accuracy of the caliper, calibration needs to be conducted.
Industrial companies may conduct in-house calibration of their calipers or send them to laboratories with caliper calibration services. However, for the traceable digital caliper and those that need a traceable certificate that calibration laboratories and high-accuracy industries use more often, calibration should be conducted by a calibration laboratory traceable on the metrology traceability chain.
If you are a hobbyist, owning a machine shop, or workshop, below are detailed guidelines to give you an idea of how calibration of the caliper is done and help you verify if your caliper is still in good condition since calibration service is pricey. However, do not sacrifice the quality of the caliper over the cost. Experts should still conduct the actual calibration.

A caliper can measure the dimensions of parts in four ways by using the lower jaws for inside measurement, the upper jaws for outside measurement, the step gauge, and the depth gauge. The calibration procedure that will be discussed in this article applies to different kinds of calipers, such as vernier calipers, digital calipers, and dial calipers. However for dial caliper, since it has a dial scale indicator, requires an additional calibration procedure. For the process of calibration, there are no exceptions for whatever kind of material a caliper is made of, whether it is made of stainless steel, or there are plastic components.
Reasons Behind the Caliper Calibration
The main reason to calibrate a caliper is because of its metrological properties called a maximum permissible error called Scale Shift Error, S, and Partial Surface Contact Error, E, which are both specified in ASME B89.1.14-2018 and ISO 13385. Scale Shift Error, S, is applied to the inside measurements, depth measurement, and step measurement. Partial Surface Contact Error, E, is applied to the outside measurement using the lower jaw.
Calibrating a caliper means to assure that the caliper will still satisfy the Maximum Permissible Error (MPE).
During calibration, the actual error of the caliper must be determined in order to obtain an accurate measurement.
Read: Types of Errors that may Happen to Caliper.
There are factors that affect the measurement accuracy of the caliper such as long time and frequent use of the caliper. Mishandling and improper care of the caliper might cause major damage to the caliper. If daily verification of the caliper and periodic calibration are not conducted, the measurement may be questionable.
Materials Needed in Calibrating A Caliper?
a. Calibration Grade Gauge Blocks – Prepare calibration grade gauge blocks in Grade 0 or Grade AS1, in any length which should satisfy the maximum length of the caliper for calibration. It must be in good condition. Using gauge blocks is the simplest method and the most common method to calibrate a caliper. Make sure the blocks are calibrated as well.
b. Caliper checker or Check Masters – Check masters offer fewer errors than stacking gauge blocks. Check master length should range up to the maximum length of the caliper for calibration.
c. Depth Micro Checkers and Step masters – This is a precision tool used in calibration and verification of depth caliper and for as well as micrometer calibration and verification. It is more convenient to use during checking the step measurement of the caliper.
d. Gauge Block Holder – It will be used in stacking gauge blocks and half-round jaws in a necessary length.
e. Jaws or Half Round Jaw set – To make a certain length, the half-round jaw will be stacked together with the gauge blocks.
f. Pin Gauge or Plug Gauge – Instead of gauge block, a pin gauge or a plug gauge is used to check critical portions of the measuring faces of the jaws of the caliper. Since gauge blocks have larger contact points to the measuring faces of the lower jaws of a caliper, there will always be bigger errors that might be encountered during the measurement. A pin gauge will have a single contact point on each measuring face of the jaws due to its round shape. Therefore a more accurate measurement is possible to determine if the proper way of checking is conducted. If your caliper is used for workshop use, it is more convenient to use a gage block or a check master.
g. Ring Gauge – A ring gauge is used to calibrate the upper jaws of the caliper for inside measurements, such as inside measurement.
h. Surface plate – A surface plate is needed as a datum plane for measurement using measuring equipment. In the calibration of the caliper especially for depth measurement. Surface plates serve as a datum plane for a caliper checker or check masters as well as the stacked gauge blocks.
i. Thermometer and Hygrometer – Maintain the temperature to the ideal calibration temperature which is 20°C/68°F and relative humidity from 30% to 40%. You can use calibrated psychrometer in this case.
j. Datasheet/Worksheet/Checksheet – A checksheet is used as a record of data during our calibration. It is better to record our data to review it after the calibration. In case the caliper does not satisfy the standard measurement during calibration, it is easier to make necessary actions such as repair or adjustments.
As of now, there is readily available software that easily analyzes the gathered measurement during calibration. This software easily computes the uncertainties and helps determine the errors. Excel files can also help in computation by transferring formulas to get the errors and measurement uncertainty.
It can also be observed in the measurement process that will be discussed below that at least 3 to 5 data is needed for every required nominal size for repeatability which is defined in American Standard ASME B89.1.14-2018. The amount of certain testing points depends on the length to be measured.
k. Cleaning materials – Use lint-free cloth and isopropanol.
l. Gloves – In holding the equipment and calipers during calibration, use lint-free gloves.
Preliminary Inspection and Reconditioning of the Caliper and Other Instruments to be Used
Calibration of caliper starts with a visual inspection. This will prevent waste of time during calibration because some defects cannot be corrected by simple adjustments and need a major repair. If in case you will send your caliper to a calibration laboratory this will also help you to decide if you will send the caliper for calibration or repair.
Here are the checkpoints for the preliminary inspection of a caliper for calibration.
1. No damage
For the overall appearance of the caliper, check if all the components of the caliper are complete and there are no damaged or broken components. If there are any lacking and damaged components, the caliper should be repaired.
2. The Reading is Visible
Check the scale and graduation is visible. Faded graduation cannot be used. For a digital caliper, check the LCD if the reading is visible. Check if it was due to the battery, if there’s a major problem with the LCD, it needs to be sent to repair services. For dial calipers, place the caliper in a surface plate free from any vibration, if a dial indicator needle moves it needs to be adjusted. If after adjustment it still moves, it should be sent to repair services.
3. Smooth Sliding
The sliding movement of the caliper must be smooth. The flatness of the beam may affect the sliding movement of the caliper as well as foreign materials, dirt, or rust.
4. Ensuring Flatness
Confirm the flatness of the sides of the beam of the caliper using a steel rule or the surface plate. There has to be no gap between the beam and the surface plate.
5. No nicks, burrs, dents, dirt, etc
Check the appearance of the jaws for upper and lower measurement. Are there any nicks, burrs, dents, dirt, or any other foreign material? Dirt and foreign materials can be cleaned using a brush, isopropanol, and lint-free cloth. If there are nicks and dents use an Arkansas Stone to correct the defect. If there are nicks, classify if it is a major defect that might affect the accuracy of the measurement. Major defects should be repaired.
6. Recording
Record on the checksheet the result of the visual inspection conducted.
Preparation for the Caliper Calibration
1. Make sure that the masters, gauge blocks, ring and pin gauge, surface plates and any other equipment to be used must be cleaned before starting calibration. It must be free from any form of foreign materials such as dirt, dust, corrosion, etc. It must also be free from any form of damage.
2. The measuring faces of the lower jaws of the caliper should be parallel to each other. To verify the alignment of the measuring faces, carefully close the jaw and place it against the light. If there are any spaces, the caliper is defective. Re-align the lower jaws by tightening the screw of the movable jaw then recheck. Repeat the process until the jaws will completely be parallel to each other. If it cannot be corrected, send the caliper to the authorized repair service.
3. Prepare the worksheet or checksheets. Input basic data needed such as the caliper type, model no., serial no., code or ID (if you have assigned code), manufacturer’s name, size or range of the caliper, and the technician or custodian name.
4. Check and maintain the temperature of the calibration room. Use a thermometer and hydrometer. Ideally, room temperature should be controlled to 20°C or 63°F and at least 30% to 40% relative humidity. This temperature and relative humidity are important to implement to increase the reproducibility of your calibration.
5. Store all the caliper, masters, ring gauge, pin gauge or plug gauge, gauge blocks, and other equipment in one place of the calibration room for at least two (2) hours before starting the calibration.
Caliper Calibration Process
1. Record the actual temperature and relative humidity on your worksheet/checksheet before you conduct the necessary measurement. It should be 20°C or 63°F ±2 and 30% to 40% relative humidity. Record also the date and time.
2. Prepare the needed gauge blocks, cylindrical pin gauge, or plug gauge based on the length indicated on the checksheet.
3. Prepare the caliper checker or the check masters. You may also wring and stack the gauge blocks and half-round jaws for the required length indicated on the checksheet. Use gauge block holders.
4. Zero set the caliper.
For vernier calipers, make sure that the “0” graduation of the vernier scale is aligned to the “0” graduation of the main scale once you close the jaws. When the two lines did not align, there is a zero error on the vernier caliper that can be corrected by adjustment.
For digital calipers, when you close the jaws with sufficient force, push the zero button near the display.
For dial calipers, upon closing the jaws, gently turn the dial until the dial indicator needle reached the “0” line.
Like zeroing a micrometer, Always zero set the caliper when starting a measurement on each length or nominal size indicated on the checksheet.
5. Data gathering and recording of data. For this process, the way to gather data is different between the outside, inside, depth, and step measurements.
6. Evaluate the data and finalize the calibration result.
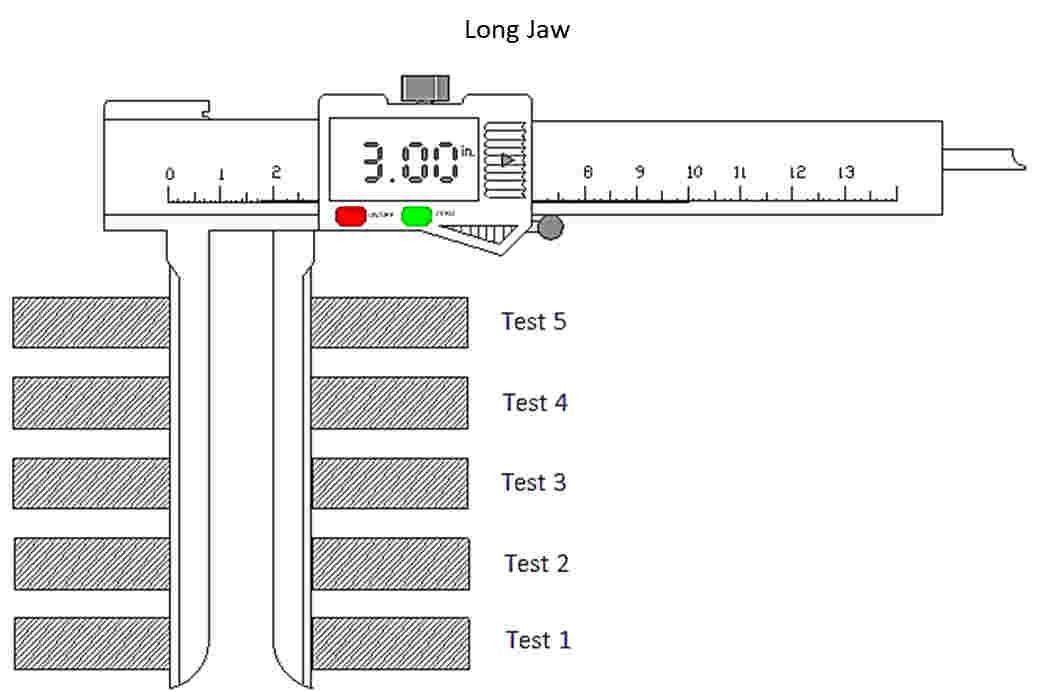
For Outside Measurement
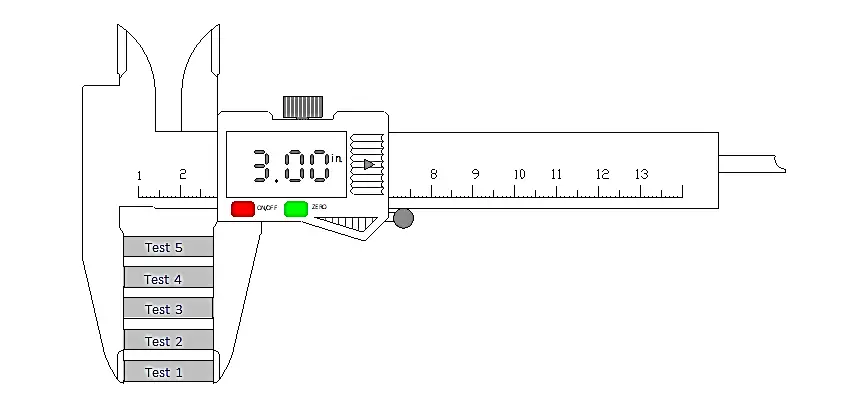
a. Use a caliper checker or check master, single gauge blocks, and wrung gauge blocks, as well as the stacked gauge blocks in a gauge block holder. Any of these can be used. You can also use a cylindrical pin gauge or plug gauge. The longer the caliper to calibrate, the longer the needed range of stacked gauge blocks and check masters are needed. Single gauge blocks and cylindrical pin gauge and block gauge can be used for a small length or nominal size. These are often also used during verification.
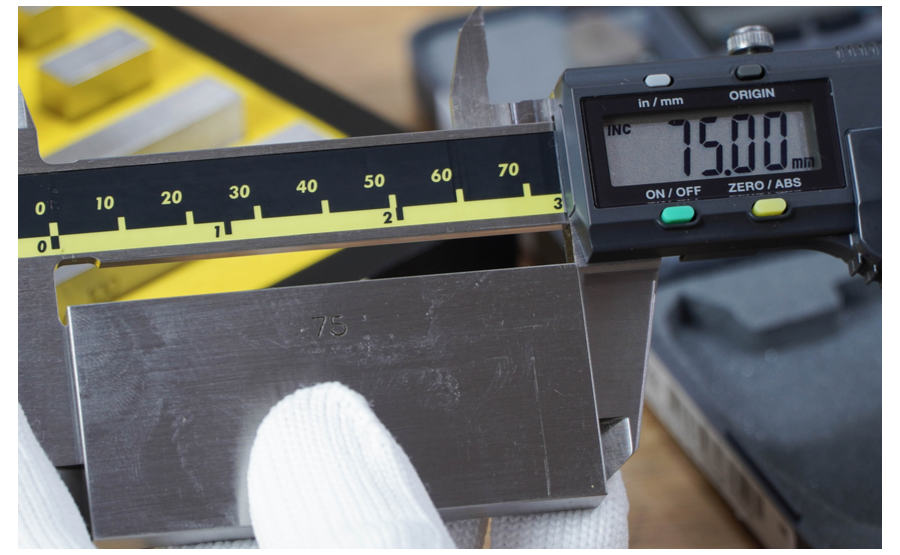
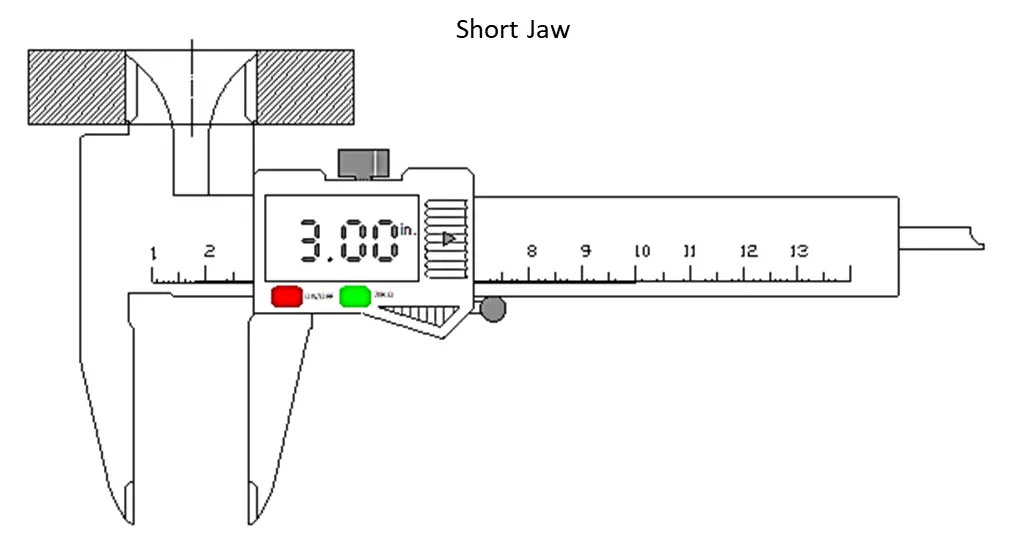
b. At the specific length required on the worksheet/checksheet conduct at least 3 to 5 measurements from 3 to 5 different points on the measuring face of the lower jaws. For example, repeat the outside measurement 5 times using a 75 mm gauge block like the following image.
c. Record the data on your worksheet.
For Inside Measurement
a. Use ring gauge, caliper checker or check masters, stacked gauge blocks, and half-round jaws for the required length indicated on the worksheet/checksheet.
b. At the specific length required on the worksheet/checksheet conduct at least 3 to 5 repeat measurements.
c. Record the data on your worksheet.
For Step Measurement
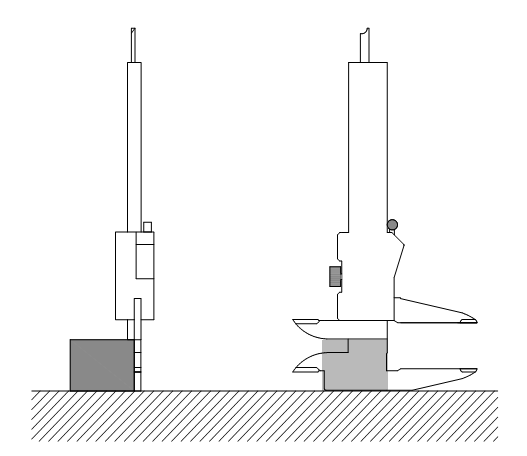
a. Zero the step of the caliper jaws by using the surface plate. There should be no gap and the faces of the step should be completely parallel to the surface plate.
b. Place the gage block and depth micro checker or step master on the surface plate. For a single gage block, prefer to use a square gage block.
c. Parallel to the surface plate, hold the caliper against the gage blocks and conduct at least 3 to 5 measurements from 3 to 5 different contact points of the step if possible, or conduct repeat measurement at least 3 to 5.
d. Record the data on your worksheet/checksheet.
For Depth Measurement
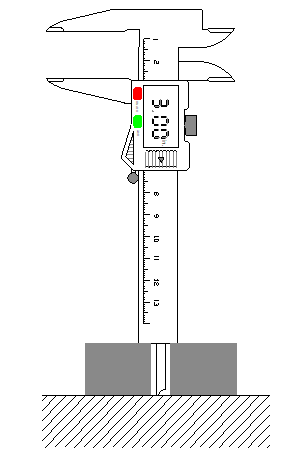
a. Use square gauge blocks or step masters with holes.
b. Zero the depth on the surface plate. It should be completely parallel.
c. Insert the rod on the hole of the gage block or step masters and conduct repeat measurement at least 3 to 5 for each length indicated on the worksheet/checksheet.
d. Record the data.
Last Thought
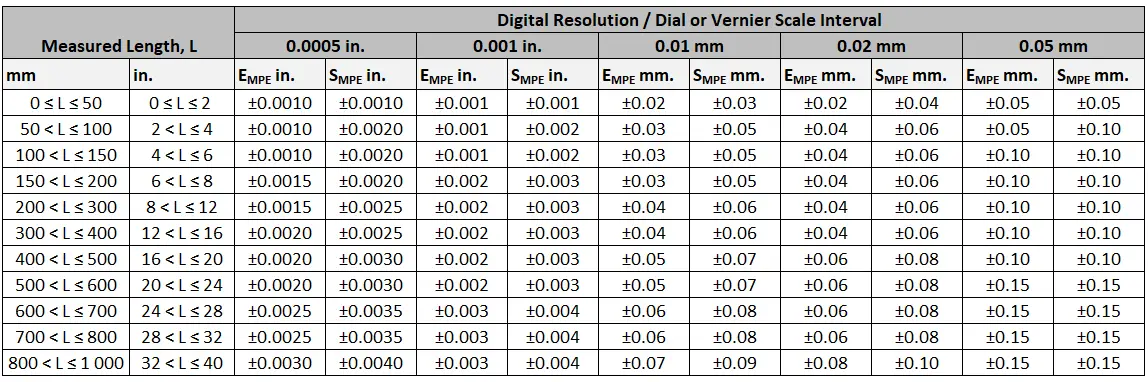
The process of calibration for the caliper should be based on the American Standard ASME B89.1.14-2018 or International Standard ISO 13385. Determining the result should also be based on these standards.
As stated above, the two main reasons for caliper calibration are that they should meet the required maximum permissible error of the caliper which is part of the metrological characteristics of the caliper which are the Scale Shift Error, S, and the Partial Surface Contact Error, E.
To determine the result of the data from calibration, the table below defined in ASME B89.1.14-2018 can be used which provides both millimeter and inch units of measurement. Apply the maximum permissible errors (MPE) based on the measurement process conducted.
Other posts under the category “Caliper”:
- What is Caliper? Benefits, Parts, & Types
- Working Principle: How A Caliper Works (Vernier, Dial, & Digital Model)
- Micrometer Vs. Caliper
- The History of Caliper
- What is Vernier Scale?
- Vernier Vs. Dial Vs. Digital Caliper
- Best Digital Caliper Reviews
- Best Dial Caliper Reviews
- Dial Caliper Brand Reviews
- Best Skinfold Caliper Reviews
- Best Vernier Caliper Reviews
- How to Read Vernier Caliper
- Guide on How to Read Digital Caliper
- How to Read Dial Caliper
- Caliper Calibration – for Digital, Dial, & Vernier Model
